
There is a distinct kind of magic that happens when you combine rich vanilla custard, sweet fresh bananas, and simple vanilla wafers. If you have been searching for the ultimate, old-fashioned banana pudding recipe, you have finally found the one that will end all your searching.
This classic Southern dessert is an absolute staple at family gatherings, summer barbecues, and holiday potlucks. It evokes a sense of nostalgia that simply cannot be replicated by modern, complicated pastries.
This recipe is perfect for home cooks who want to elevate their dessert game by ditching the boxed mix and making a velvety, homemade vanilla custard from scratch. It is also a lifesaver for busy hosts, as it is a make-ahead dessert that actually improves as it sits in the refrigerator.
By mastering this easy from-scratch banana pudding, you will have a guaranteed crowd-pleaser in your culinary repertoire. Let’s dive into how to create this beautifully layered, authentic Southern banana pudding recipe.
Summary :
To make the best homemade banana pudding from scratch, cook a vanilla custard using whole milk, egg yolks, sugar, and flour. Layer the warm custard over vanilla wafers and ripe bananas in a baking dish. Chill overnight for the best texture and top with whipped cream before serving.
Table of Contents
What Is a Classic Banana Pudding Recipe?
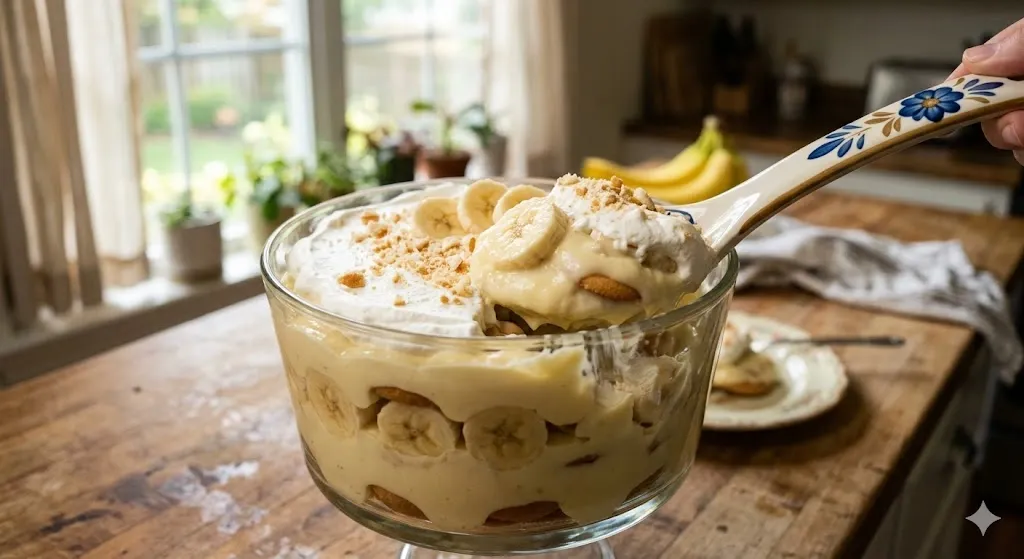
A classic homemade banana pudding recipe is a traditional Southern American dessert consisting of alternating layers of sweet vanilla custard, sliced fresh bananas, and crisp vanilla wafer cookies. Over time, the chilled custard softens the cookies into a cake-like texture, creating a rich, creamy, and cohesive no-bake trifle dessert.
Why You’ll Love This Banana Pudding Recipe
- Authentic, From-Scratch Flavor: Unlike instant pudding mixes, our homemade vanilla custard boasts a deep, buttery, and authentic vanilla profile that tastes like it came straight from a Southern grandmother’s kitchen.
- Perfectly Balanced Textures: The layering technique ensures the vanilla wafers soften into a delightful cake-like consistency without ever becoming mushy or disintegrated.
- Ultimate Make-Ahead Convenience: This dessert requires several hours in the fridge to set, making it the perfect prep-ahead recipe for holidays and parties. You do the work the day before!
- Accessible Ingredients: You do not need any fancy culinary equipment or obscure ingredients. Everything required for this easy banana pudding recipe is likely already sitting in your pantry.
- Customizable Toppings: Whether you prefer a cloud of freshly whipped heavy cream or a traditional, golden-brown baked meringue, this base recipe accommodates both beautifully.
Ingredients
To achieve the best banana pudding recipe, high-quality, fresh ingredients are essential. Here is what you need for each component of the dessert.
For the Homemade Vanilla Custard:
- 3/4 cup Granulated Sugar: Provides the perfect amount of sweetness without overpowering the bananas.
- 1/3 cup All-Purpose Flour: Acts as the primary thickener for the pudding. (Substitution: You can use 1/4 cup of cornstarch for a gluten-free banana pudding option).
- 1/4 teaspoon Kosher Salt: Balances the sweetness and enhances the vanilla flavor.
- 3 large Egg Yolks: Gives the custard its rich, luxurious texture and beautiful pale yellow color. Save the whites if you plan to make a meringue!
- 3 cups Whole Milk: Whole milk is non-negotiable here for the creamiest mouthfeel. Avoid skim milk, as it will make the pudding watery.
- 1/2 cup Unsalted Butter: Cut into small cubes. This is stirred in at the end for a silky, glossy finish.
- 2 teaspoons Pure Vanilla Extract: Always use pure extract or vanilla bean paste, never imitation vanilla, for authentic flavor.
For the Layers:
- 1 box (11-12 oz) Vanilla Wafers: Nilla Wafers are the gold standard for an old-fashioned banana pudding.
- 4-5 large Ripe Bananas: Look for bananas that are bright yellow with just a few brown speckles. They should be firm enough to slice but sweet and fragrant.
For the Whipped Cream Topping:
- 1 1/2 cups Heavy Whipping Cream: Must be very cold.
- 3 tablespoons Powdered Sugar: To lightly sweeten the cream.
- 1 teaspoon Pure Vanilla Extract: For a touch of extra flavor.
How to Make Banana Pudding (Step-by-Step)

Follow these clear, step-by-step instructions to create the perfect layered dessert.
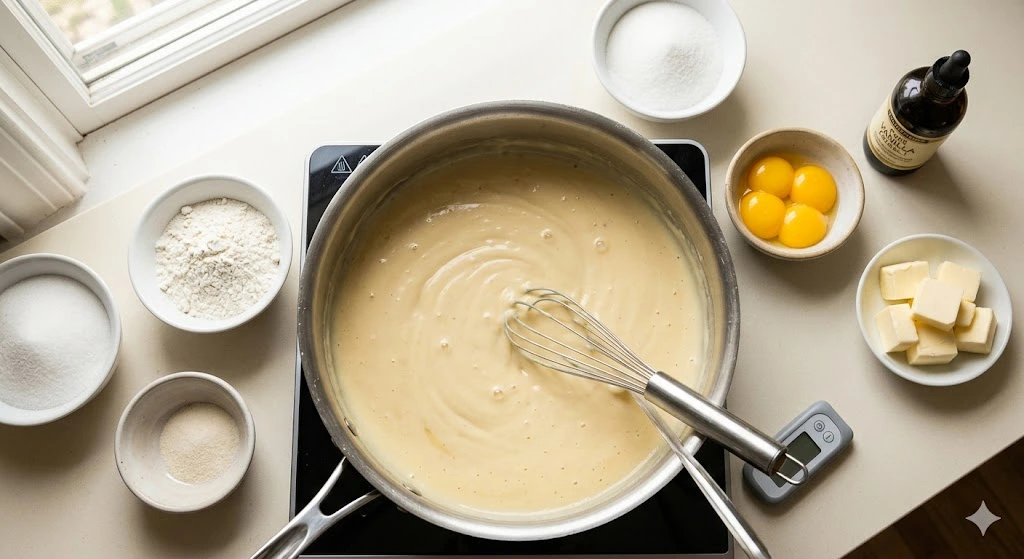
Step 1: Whisk the Dry Ingredients In a medium, heavy-bottomed saucepan, whisk together the granulated sugar, all-purpose flour (or cornstarch), and kosher salt. Do this off the heat to ensure no lumps form.
Step 2: Prepare the Wet Ingredients In a separate medium mixing bowl, lightly beat the egg yolks. Gradually pour the whole milk into the yolks, whisking constantly until the mixture is completely smooth and cohesive.
Step 3: Combine and Cook the Custard Slowly pour the milk and egg mixture into the saucepan with the dry ingredients, whisking until smooth. Place the saucepan over medium heat. Tip: Do not turn the heat higher than medium, or you risk scorching the milk on the bottom of the pan.
Step 4: Thicken the Pudding Whisk the mixture continuously as it heats. This process will take about 8 to 10 minutes. The custard will begin to bubble gently and thicken significantly. Once it easily coats the back of a spoon and resembles thick mayonnaise, immediately remove the pan from the heat.
Step 5: Add the Butter and Vanilla While the pudding is still hot, drop in the cubed unsalted butter and pour in the vanilla extract. Stir gently until the butter is completely melted and the pudding looks glossy and smooth. Let it sit for 5 minutes to cool slightly.
Step 6: Assemble the Layers Grab a 9×13 inch baking dish or a glass trifle bowl. Cover the bottom with an even layer of vanilla wafers. Top the cookies with a layer of freshly sliced bananas. Pour about one-third of the warm vanilla custard evenly over the bananas.
Step 7: Repeat the Process Repeat the layering process—wafers, bananas, and warm custard—two more times. Ensure your final layer on top is the warm vanilla custard.
Step 8: Chill and Set Place a piece of plastic wrap directly onto the surface of the top layer of pudding. This prevents a rubbery “skin” from forming. Refrigerate the dessert for a minimum of 4 hours, though leaving it overnight (8-12 hours) is highly recommended for the best texture.
Step 9: Whip the Topping and Serve Just before serving, use a hand mixer to beat the cold heavy whipping cream, powdered sugar, and vanilla extract until stiff peaks form. Spread the whipped cream over the chilled banana pudding and garnish with crushed vanilla wafers.
Pro Tips for Perfect Results
- Preventing Brown Bananas: To keep your fresh bananas looking vibrant, lightly toss the slices in a teaspoon of fresh lemon juice or pineapple juice before layering them. The citric acid halts the oxidation process.
- Tempering is Not Required: Because we mix the eggs with cold milk before introducing heat, you do not need to temper the eggs in a separate step. Just be sure to whisk continuously while cooking to prevent scrambled eggs!
- The Warm Pudding Trick: Assembling the layers while the homemade custard is still warm is the secret to a great old-fashioned banana pudding. The gentle heat slightly softens the wafers and releases the natural oils in the bananas, merging the flavors beautifully.
Variations and Substitutions
- Magnolia Bakery Style: If you prefer a lighter, fluffier texture, fold an 8oz block of softened cream cheese and a can of sweetened condensed milk into your chilled custard before assembling.
- Gluten-Free Banana Pudding: Swap the all-purpose flour for cornstarch in the pudding base, and use your favorite brand of certified gluten-free vanilla wafers or shortbread cookies for the layers.
- Baked Meringue Topping: For a highly traditional Southern approach, skip the whipped cream. Beat your leftover egg yolks with 1/4 cup of sugar and a pinch of cream of tartar until stiff peaks form. Spread it over the hot pudding assembly, and bake at 350°F (175°C) for 10-12 minutes until golden.
- Chessmen Cookie Variation: Swap out the traditional round vanilla wafers for Pepperidge Farm Chessmen cookies. Their buttery, shortbread flavor adds a rich, decadent twist to the recipe.
How to Store and Reheat
Storing in the Refrigerator: Homemade banana pudding should always be stored in the refrigerator. Keep it tightly covered with plastic wrap or in an airtight container. It will stay fresh and delicious for up to 3 days. Beyond the third day, the bananas will begin to weep liquid, and the cookies will become overly mushy.
Freezer Instructions: Can you freeze banana pudding? It is highly discouraged. Freezing alters the molecular structure of the homemade custard, causing it to separate and become watery when thawed. Furthermore, freezing turns fresh bananas black and completely ruins their texture. This dessert is strictly a refrigerator-only treat!
What to Serve with Banana Pudding

This rich, creamy dessert pairs beautifully with savory, hearty meals. It is the ultimate palate cleanser after heavy, salty dishes.
- Serve it after a classic Southern feast alongside [Fried Chicken Recipe] and [Macaroni and Cheese Recipe].
- It is the perfect sweet ending to a summer cookout featuring [ BBQ Ribs Recipe] or [Pulled Pork Sandwiches].
- Offer it at your holiday table next to traditional favorites like [Leftover Chicken Casseroles].
FAQs
How do I keep bananas from turning brown in banana pudding?
To prevent bananas from oxidizing and turning brown, toss the freshly sliced rounds in a small amount of lemon juice, orange juice, or club soda before assembling. Additionally, ensuring the bananas are completely encased in the pudding limits their exposure to air.
Can I make banana pudding ahead of time?
Yes, this recipe thrives when made ahead of time! Assembling the pudding 8 to 12 hours before serving allows the vanilla wafers to absorb the moisture from the custard, transforming them into a soft, cake-like texture that defines the dessert.
Is it better to use instant pudding or make it from scratch?
Making the vanilla custard from scratch yields a vastly superior, buttery flavor and a silky texture that boxed mixes cannot replicate. However, if you are extremely short on time, using instant vanilla pudding is an acceptable shortcut.
What are the best vanilla wafers for banana pudding?
Nabisco Nilla Wafers are considered the traditional gold standard due to their specific crunch and vanilla profile. However, buttery shortbread cookies, like Chessmen cookies, or generic store-brand vanilla wafers also work wonderfully.
Can you freeze homemade banana pudding?
No, you should never freeze homemade banana pudding. The freezing and thawing process breaks the emulsion of the custard, causing it to separate and become watery, while turning the fresh bananas unappetizingly dark and mushy.
Why did my banana pudding get watery?
Banana pudding becomes watery if the custard is not cooked long enough to fully thicken, or if the dessert sits in the fridge for more than 3 to 4 days, causing the fresh bananas to release their natural moisture into the pudding layers.
Nutritional Information
The following values are approximate and based on 1 serving (assuming the recipe yields 12 servings).
- Calories: 340 kcal
- Carbohydrates: 45g
- Protein: 5g
- Fat: 16g
- Saturated Fat: 9g
- Cholesterol: 115mg
- Sodium: 180mg
- Sugar: 30g
Final Thoughts
There is a reason this ultimate Southern homemade banana pudding recipe has stood the test of time. With its luscious, velvety custard, sweet fresh fruit, and cake-like softened cookies, it delivers pure comfort in every single bite. Taking the time to craft the pudding from scratch elevates this dish from a simple potluck contribution to an unforgettable, show-stopping dessert.
Do not be intimidated by making custard on the stovetop; follow the steps, and you will be amazed at your own culinary skills. If you try this recipe and love it as much as we do, please leave a star rating and a comment below to let us know how it turned out at your family gathering!